Getting Started
This page takes you through one complete cleanup: choosing what to scan, finding duplicate files, choosing which copies to remove, and deleting them safely. Each step links to the page that explains it in full.
Installing SpaceMan 99
SpaceMan 99 is available from the Microsoft Store (search for "SpaceMan 99"), or as a download from www.extrabit.com/spaceman99.
The Microsoft Store keeps the Store version up to date. The downloaded version checks for updates itself, once a day, and shows a blue dot on the Settings button in the toolbar when one is available (see Settings).
Step 1: Choose what to scan
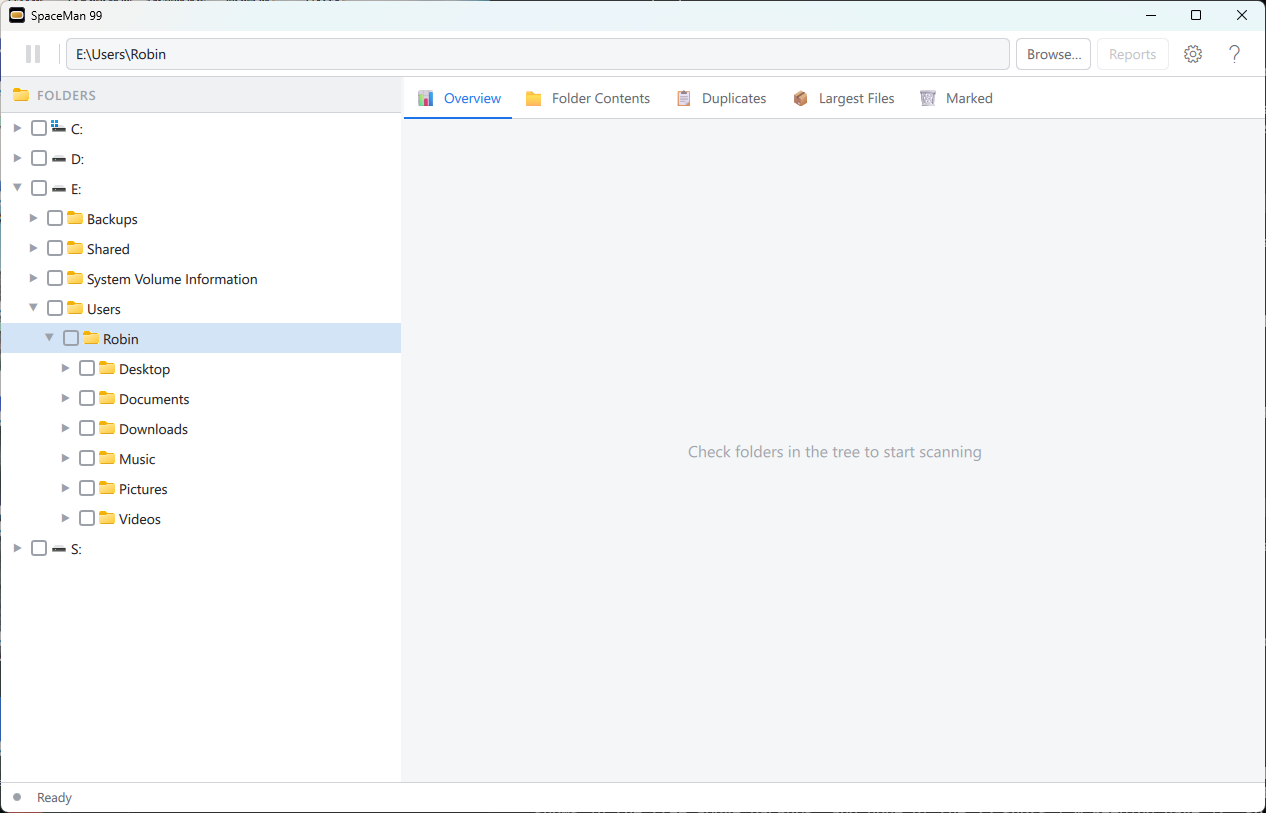
The first time you start SpaceMan 99, it opens on your own user folder. The folder tree on the left shows your drives, with your user folder selected, but nothing has been scanned yet.
Clicking a folder selects it: you can browse anywhere, and the Folder Contents tab on the right lists what is inside the selected folder.
Ticking a folder's checkbox includes it in the scan. Scanning starts straight away, and covers the folder and everything inside it. Tick as many folders as you like.
These are two separate things, and the difference matters: see Choosing What to Scan.
Where to start
Your user folder, or a whole data drive, is a good first scan. Scanning all of drive C: works too, but most of it is Windows and your programs, which are not yours to clean up.
The AppData folder
Your user folder contains a folder called AppData, which File Explorer
hides. It is often one of the largest folders you have, because it is where
programs keep their settings, caches and data. It is also the least safe
place to delete from: removing files there can make programs lose their
settings or stop working. Look at it by all means, but think twice before
deleting anything inside it.
Step 2: Let the scan run

While SpaceMan 99 scans, the status bar at the bottom of the window counts the folders and files it has read, and sizes appear in the folder tree as each folder is finished. You can carry on browsing, and ticking or unticking folders, while it works.
SpaceMan 99 scans, and searches for duplicates, at low priority, so that your other programs come first. On a hard disk it gives way to any other program reading the same disk, so a scan or a search there takes longer while that program is busy.
The Pause button at the left of the toolbar pauses the scan, and resumes it.
Step 3: Find the duplicates
When the scan finishes, SpaceMan 99 searches the scanned files for duplicates: files whose contents are identical, whatever they are called and wherever they are. It works in two steps, and the status bar shows how far each has got: "Finding duplicates — step 1 of 2" and then "step 2 of 2", with a percentage.
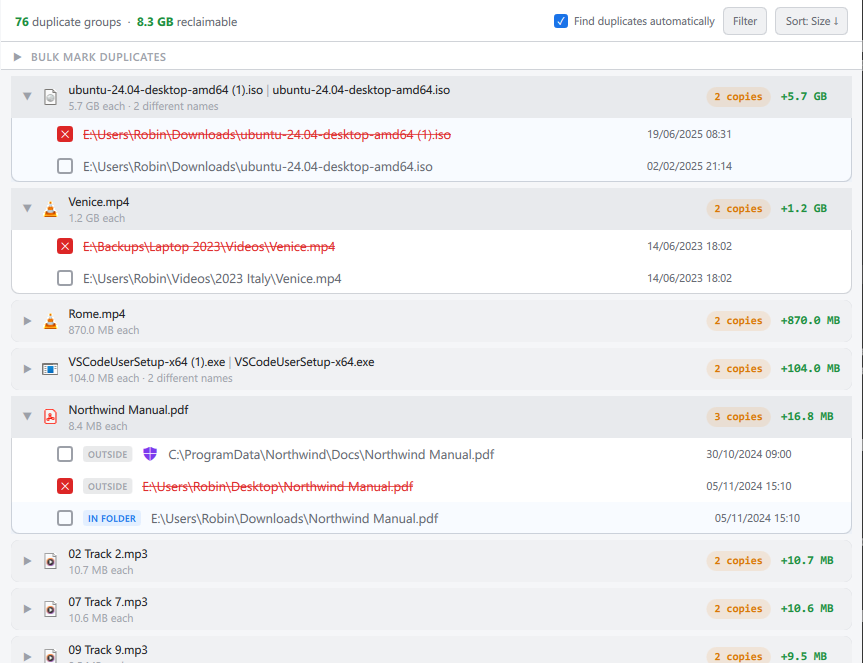
The results are on the Duplicates tab. Each entry is a duplicate group: a set of files with identical contents. The largest savings are listed first, and the Overview tab shows the top five as Quick Wins. See Duplicate Groups for what counts as a duplicate.
Step 4: Mark the files you want to remove
Expand a group by clicking it, and tick the checkbox beside each copy you want to remove. A marked file is shown in red and struck through, on every tab.
Marking a file does not delete it. Nothing leaves your disk until you review the marked files and delete them in step 6, so you can mark freely and change your mind. See Marking Is Not Deleting.
You can mark files on the Folder Contents and Largest Files tabs as well, and you do not have to find duplicates first: any file can be marked.
Note
Marks last until you close SpaceMan 99. They are not saved, so finish the cleanup before you close it.
Step 5: Review the marked files
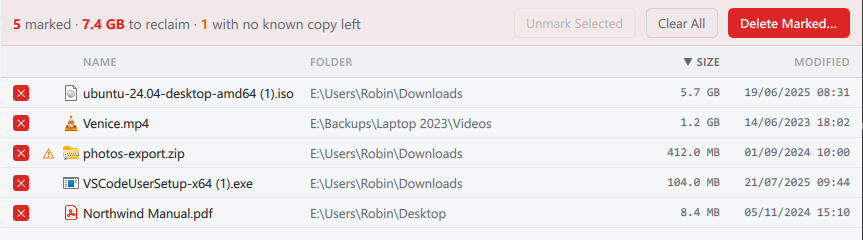
The Marked tab lists every marked file, with the number of files and the space they take. Its tab shows a red badge with the count whenever anything is marked.
Check the list before deleting. An amber warning
 beside a file means that
deleting it would leave no copy of that file anywhere SpaceMan 99 knows about:
either every copy is marked, or the file has no duplicates at all. To keep a
file, untick it, and it leaves the list.
beside a file means that
deleting it would leave no copy of that file anywhere SpaceMan 99 knows about:
either every copy is marked, or the file has no duplicates at all. To keep a
file, untick it, and it leaves the list.
Step 6: Delete
Press Delete Marked... on the Marked tab. A confirmation dialog lists the files once more, and nothing is deleted until you press Delete in it.
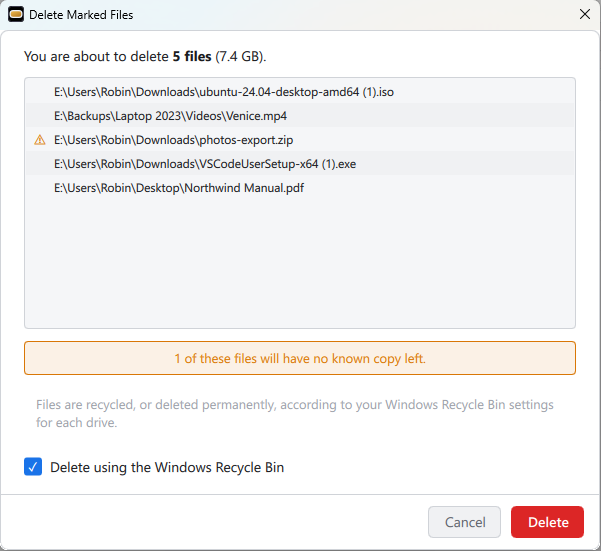
Delete using the Windows Recycle Bin is ticked to begin with. It hands the delete to Windows, which moves the files to the Recycle Bin, shows its own progress window, and asks before deleting permanently anything that cannot be recycled. Untick it to delete the files permanently.
The dialog also stops you, with a red band, if you have marked files in a Windows or program folder, or files on a network location with the Recycle Bin option ticked. Deleting Files explains each of these.
When the delete finishes, the deleted files leave the Marked tab and every list. If everything went to the Recycle Bin as asked, that is all you see. Otherwise a summary says what happened: files deleted permanently rather than recycled, files left because you canceled, and any that could not be deleted.
Where next
- The Main Window describes every part of the window.
- Reports turns a scan into a summary, folder sizes, file types, duplicates or largest files.
- SpaceMan 99 Pro lists what a Pro license adds.