How to Verify a Downloaded File Against a Checksum on Windows
When a download page publishes a checksum, here are the realistic ways to verify the file you downloaded against it on Windows — and the fastest one, with an automatic MATCH / NO MATCH result.
When you download anything from the internet — an installer, an ISO, a command-line tool, a backup archive — the publisher often lists a checksum next to the download link. The point of that checksum is for you to compute the same hash on the file you received and confirm the two match: proof that the file wasn't corrupted in transit and wasn't tampered with somewhere between the publisher and your hard drive.
The catch is that Windows doesn't make computing that hash particularly convenient. There's no right-click "verify checksum" option in File Explorer, no progress bar, no compare-against-this-value field. You're expected to drop into a terminal, run a command, and compare two long strings of hex characters by eye.
Why verifying downloads matters — especially for unsigned files
Modern Windows installers from major vendors are usually code-signed. The signature is an embedded cryptographic stamp that Windows verifies automatically when you run the file: any change to a single byte invalidates it, and the publisher's identity is shown in the UAC prompt. For signed downloads, integrity is checked for you whether you ask or not.
Unsigned downloads have none of that protection. If the file is corrupted, swapped on a mirror, replaced by a compromised CDN, or modified by something between you and the server, Windows can't tell — it has nothing to compare against. The only thing that can tell is the checksum the publisher posted on their own website, served over HTTPS, computed before they uploaded the file. Compare that value to the hash of the file you actually received and a mismatch means the file is not what the author shipped.
A lot of legitimate, widely used software is distributed unsigned:
- Open-source binaries from GitHub releases, project websites, and SourceForge mirrors
- Linux ISO images and other operating-system installers
- Portable apps that ship as a ZIP rather than a signed installer
- Command-line tools, build tools, and language runtimes distributed as raw executables
- Security and forensics tools where the binary is built fresh for each release
- Backup and archive files retrieved months or years after they were created
Any of these can — and do — get corrupted, mirror-swapped, or tampered with. Verifying against a published checksum is the standard defense, and for a signed file it's a useful second check on top of the signature, especially for installers that will run with administrator rights.
The reason most people skip this step most of the time is friction. The checksum is sitting right there on the download page; the file is sitting right there in your Downloads folder; and the gap between them is "open a terminal and remember the right syntax". Close that gap and verification becomes the default.
The built-in options
PowerShell Get-FileHash
Get-FileHash "C:\Users\you\Downloads\installer.exe" -Algorithm SHA256
The modern, supported answer. It works, it's accurate, and it ships with every current version of Windows. The downsides are practical: you need to open PowerShell, type or paste the full path, remember the cmdlet name and the -Algorithm parameter, and then visually compare the multi-line table output against the value on the website. For a one-off it's tolerable; as a workflow you do every time you download something, it's friction every time.
certutil -hashfile
certutil -hashfile "C:\Users\you\Downloads\installer.exe" SHA256
The classic Command Prompt option, on every Windows install going back years. The output is wrapped in two lines of header and footer text that you have to mentally filter past to find the hash itself. It works, but it's a tool that was built for certificate management and grew this side capability — it shows.
Third-party hash utilities
There are dedicated GUI hash-checker tools that paste two values into a comparison field and tell you whether they match. They do exactly the job, and if you verify checksums constantly they're worth installing. For most people, though, that's a separate utility to find, install, keep updated, and remember to use — for a task that should sit on the right-click menu next to "Copy" and "Properties".
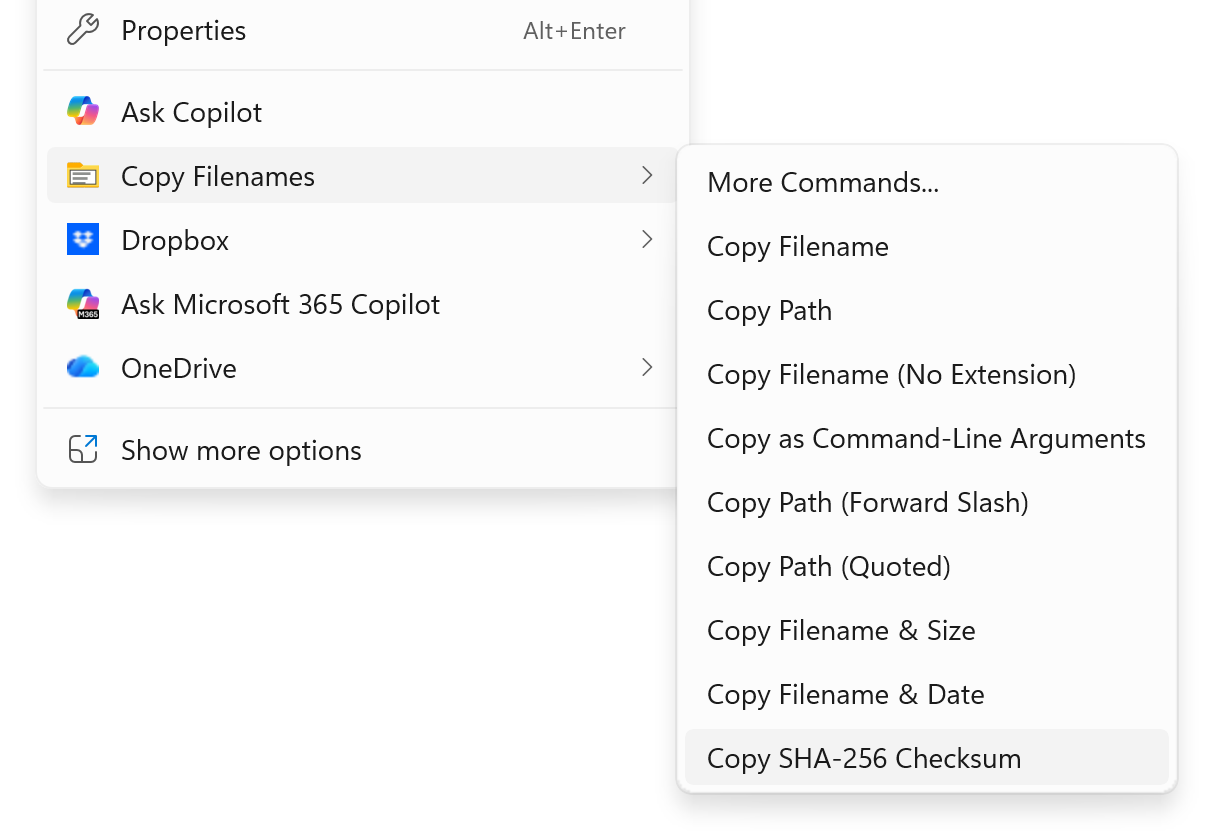
The practical solution: CopyFilenames
CopyFilenames adds a configurable Copy Filenames option to File Explorer's right-click menu. Copy SHA-256 Checksum is one of its standard commands, sitting on the menu out of the box.
Most download pages already have a one-click copy button next to the published hash, so the rest is a single right-click:
- Copy the published checksum from the publisher's download page.
- Right-click the downloaded file in File Explorer and pick Copy SHA-256 Checksum from the Copy Filenames sub-menu.
The automatic MATCH / NO MATCH result
Here's where the workflow really pays off. When CopyFilenames computes a checksum, it checks the clipboard. If it finds something already on the clipboard that has the right shape for the algorithm you just ran — 64 hex characters for SHA-256, 32 for MD5, 128 for SHA-512, and so on — it treats that value as the published checksum and opens a comparison dialog with a clear MATCH or NO MATCH result:

Both values are shown in full, so if there's a mismatch you can see exactly where they diverge. Click OK to keep the new hash on the clipboard; Cancel leaves the clipboard untouched.
If the clipboard contains anything else — ordinary text, a file, an image, nothing at all — there's nothing to compare against, so CopyFilenames just copies the new hash to the clipboard and gets out of the way. The dialog only appears when it would actually be useful.
Why this is the right shape of tool for the job
Verifying a downloaded checksum is a small task you might do dozens of times a year. The friction of opening a terminal, typing a path, remembering syntax, parsing multi-line output, and comparing two long hex strings by eye is small per occurrence but adds up — and more importantly, it's enough friction that most people skip the verification step entirely most of the time. Once the command is sitting on your right-click menu next to Copy and Properties, and the comparison happens in a dialog you don't have to set up, that friction disappears and verification becomes the default rather than the exception.
Other checksum formats
SHA-256 is the most commonly published algorithm today and is on the menu by default. CopyFilenames also supports the other formats you'll occasionally encounter:
- MD5 — still common for legacy installers and many older download pages. Cryptographically broken for adversarial use, but perfectly fine for catching accidental corruption.
- SHA-1 — also legacy and also broken for adversarial use, but still published by some projects alongside other hashes.
- SHA-512 — the longer sibling of SHA-256, occasionally used where extra hash length is preferred.
- CRC32 — a fast non-cryptographic checksum common in archive formats (ZIP, RAR) and network protocols, often published for very large downloads where speed matters more than strength.
- xxHash64 — a very fast non-cryptographic hash used in some modern tooling and storage systems.
Each algorithm has its own command in the Command Gallery under the Hashes category. Open Copy Filenames → More Commands, click Browse Gallery..., filter for the algorithm you want, and add it to your menu in a click. The automatic clipboard comparison works the same way for all of them — match the published value's shape and you get a MATCH / NO MATCH dialog instead of a manual eyeball check.
Frequently asked questions
Is this feature free?
Yes. The standard checksum commands on the Copy Filenames sub-menu, and the automatic clipboard comparison dialog, all work in the free version. No license needed for this task.
Which checksum formats does CopyFilenames support?
Six: MD5, SHA-1, SHA-256, SHA-512, CRC32, and xxHash64. Copy SHA-256 Checksum is on the right-click menu by default — the others are available in the Command Gallery and can be added to the menu in a click if you regularly verify against checksums in another format.
How does the automatic MATCH detection know what's on the clipboard?
When you run a checksum command, CopyFilenames looks at whatever is on the clipboard. If it finds a value the right length and shape for the algorithm you just ran (e.g. 64 hex characters for SHA-256), it treats it as the published value and shows the comparison dialog. If the clipboard contains anything else — text, a file, nothing — it just copies the new hash and that's that.
Why is this especially important for unsigned downloads?
A signed Windows installer ships with an embedded cryptographic signature that Windows verifies before running it, so any tampering between publisher and disk is caught automatically. Unsigned downloads have no such protection — a checksum published over HTTPS by the actual author is the only way to confirm the file you received is the file they shipped. Open-source binaries, ISO images, portable apps, and command-line tools are commonly distributed unsigned.
Should I still verify a file that's signed?
Defense in depth never hurts, and for high-stakes downloads — installers that need administrator rights, security tools, OS images — verifying a published checksum on top of the code signature gives you a second independent check from a separate channel.
Does it work in Windows 11's new context menu?
Yes. CopyFilenames supports both Windows 10 and Windows 11, including the modernized Windows 11 context menu and the classic "Show more options" menu.
Does it work on large files like ISOs and disk images?
Yes. Hashing a multi-gigabyte file takes a few seconds — the same time PowerShell or certutil would take, since the work is reading the file off disk. The result lands in the comparison dialog, or on your clipboard if there's nothing to compare against.